Physical Computing
Documentary
Life is a journey of constant meetings and partings, and graduating from college feels like a major turning point for me. Out of all the friends and professors I’ve met over the past few years, I wonder how many of them I’ll never see again after we say our goodbyes at graduation.
Year
Role
Duration
Process Of Making Furtures & Wires

Initiative
I’ve truly felt myself grow during my time at university—from living on my own for the first time, to my first serious relationship, the first time losing a relative, seeing a friend get married, serving in the military, and making friends from different cultures. I’ve put my whole heart into exploring the world and truly cherished every single one of these 'firsts.'
Spider Lilies stand for separation, longing, and independence. Therefore, I use them to capture my feelings at this moment, hoping that these emotions will become nourishment for my future and support me as I keep moving forward."
Concept
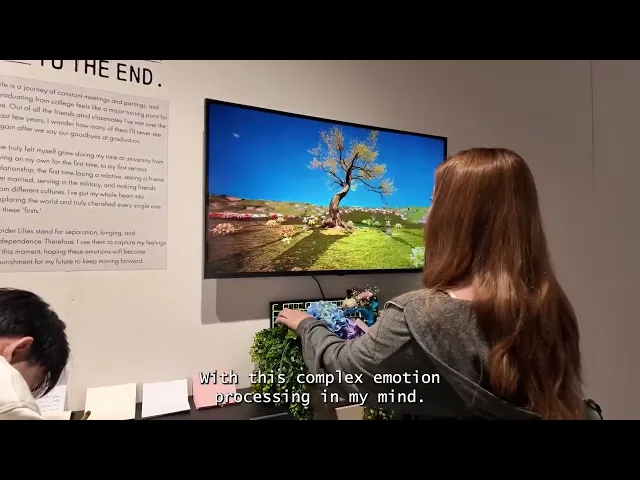
Life is a journey of constant farewells; many people, once turned away, are never seen again. My work uses the 'Lycoris radiata' (red spider lily) as a medium to transform visitors' 'farewell words' into digital vitality. By dropping handwritten messages into a collection box, the blooming and withering of flowers on the screen are triggered, symbolizing the transmission of emotions and the cycle of life.
In the tranquil screen, the Lycoris radiata sways gently in the breeze. Viewers choose a colored paper (red, white, gold, pink) according to their current mood and write a farewell message to a person, a period of time, or to me, the creator. When the handwritten note is dropped into the collection box, a built-in sensor instantly captures the color signal, triggering a chain reaction on the screen:
Life and Cycle: Depending on the color dropped, the screen will bloom with a sea of flowers of that color, which then gradually withers, transforming into flowing points of light.\
Color and Season: The four colors of the Lycoris radiata correspond to the changing seasons.
Through the slow rotation of the camera and the alternation of seasonal imagery, I attempted to express the irreversible flow of time and symbolize the eternal cycle of emotions between "blossoming" and "fading".
Process
For hardware selection, I used Arduino as the control core and selected the TCS34725 RGB high-precision color sensor. Although I had only encountered breadboards and basic sensors in courses before, this project was the first time I integrated hardware into a complete interactive device. Compared to basic sensors, the TCS34725 has more accurate color temperature and light intensity detection capabilities, ensuring that the paper color selected by the participants can be accurately digitized.
Regarding the software selection for image generation, I hesitated between TouchDesigner and Unreal Engine 5 (UE5):
TouchDesigner: Its powerful node-based computing and real-time interactivity appealed to me, making it a new tool I really wanted to try.
Unreal Engine 5: This is an area I am more familiar with; its dynamic lighting (Lumen) and particle systems (Niagara) can present extremely high-quality visual layers.
Ultimately, considering the completeness of the presentation and the predictability of the visual effects of my graduation project, I decided to choose UE5. This allowed me to focus on refining the dynamic details of the "Lycoris Radiata" to the extreme, rather than being limited by the learning curve of a new tool in the later stages of development, thus ensuring that the work could achieve the emotional atmosphere I envisioned.
Day 1
I ordered the necessary electronic components and materials from Amazon. Before the equipment arrives, I decided to conduct a Proof of Concept (PoC) test in Unreal Engine 5 (UE5).
The current logic design is as follows: When the sensor detects a color, it sends a value from 1 to 4 (corresponding to the four colors) to the system, which then triggers the corresponding flower blooming animation on the screen.
[Visual Range Limitation: Application of Trigger Box] Because the preset map is too vast, I needed to define a specific generation area to precisely control the composition. I used a Trigger Box to select a rectangular space within the image and then imported this area into a Level Blueprint to write the generation logic.

[Dynamic Generation Logic: Taking Red Flowers as an Example] The following is the logic I wrote using the "number key 1" to simulate a sensing signal: When "1" is pressed, the system dynamically generates an Actor named "BP Flower Red". Its location is determined by obtaining random X and Y axis vectors from the center point and boundary range of the Trigger Box. Furthermore, I added a Random Float in Range function to give each flower a random rotation angle and a slight Z-axis height difference.
Through these random parameter settings, I ensured that the visual presentation of the flower field had organic variation, avoiding a rigid, monotonous mechanical feel.
Day 2 ~ 4
Waking up this morning, I reconsidered how I acquired the 3D models (meshes) for my work. In the past, I was used to downloading ready-made resources from the internet, but this came with a high degree of uncertainty—it was difficult to ensure that the materials would precisely match the visual requirements in my mind. In order to maintain consistency in the work, I decided to seek a more flexible solution.
In the afternoon, I resubscribed to Midjourney. Using Text-to-Image technology, I was able to precisely sketch my ideal image of the spider lily. I greatly appreciate the community features on the Midjourney website; by referencing keywords from other people's work, I can quickly pinpoint a specific visual style, significantly reducing the time spent blindly exploring. I also plan to use this to build my own "Prompt database." After determining the initial style, I only need to adjust the color parameters in the instructions to easily generate a series of reference images with a unified style and different colors.
Prompt: "Color I Want" Spider Lily flower, petals made of transparent plastic with holographic details. During summer, the background is blurry and light pink, with soft lighting effects creating an ethereal atmosphere. The overall style captures a sense of mystery and elegance. High resolution. This artwork was created using Cinema 4D software."
Once I got my first favorite style, the next step was to change the colors in the Prompt. I easily obtained a series of reference images of spider lilies in the same style.


Next, I imported the generated image into Meshy.ai for 3D modeling. The result was unexpectedly excellent; the flower's external structure, internal details, and the naturalness of the petal curves were all more vivid and realistic than expected. I was glad I had prior experience using this tool, as it came in handy at this moment. Although there was still room for fine-tuning the model's detail, to avoid getting bogged down in excessive details, I decided to focus on the overall visual progression first.

After importing the model into UE5 and replacing the original test block, the resulting visual tension is exhilarating. The beauty of the spider lily, with its dangerous aura emanating from its intricate structure, perfectly captures the mood I was seeking.

[Camera Language and Dynamic Transitions] Initially, I envisioned a static shot with a gentle breeze, creating a serene and dynamic aesthetic reminiscent of Wallpaper Engine. However, while arranging the materials, a thought flashed through my mind: "Why not assign a unique temporal and spatial theme to each color of flower?" Thus, the following rough sketch was born:
RED: Represents spring, scene is nighttime.
Pink: Represents summer, scene is morning, butterflies flutter.
Gold: Represents autumn, scene is afternoon, sunset, falling leaves.
White: Represents winter, scene is nighttime, snowflakes fall, withered trees.
The camera slowly rotates around the tree. Each time a mechanism is triggered, there's an Ease Out transition animation to the corresponding season, and the corresponding flower blooms.
Dynamically, the camera slowly rotates around the central tree (Orbiting Camera). When the sensor is triggered, the system executes a smooth Ease Out transition animation, switching the scene to the corresponding season. Simultaneously, the corresponding spider lily blooms in the scene.


Creating the surround shot wasn't complicated, but a lot of time was spent on fine-tuning the details (I'M Pissed). To achieve a stable rotation effect, I adopted the following architecture:
Component Configuration: Create an Actor Blueprint as the control core and add a SpringArm to the Component list.
Hierarchy: Set the Camera as a child of the SpringArm. This hierarchy allows the Camera to orbit around the SpringArm's starting point.
Distance Adjustment: In the SpringArm's details panel, adjust the Target Arm Length to precisely control the distance between the camera and the center point of the tree.

In the Event Graph, I used the Add World Rotation function to drive the overall dynamic effect. The core logic lies in changing the value of the Z-axis (Yaw): the higher the value, the faster the rotation speed. Although I felt anxious at times during the process, I ultimately succeeded in making the camera rotate smoothly around the center point, creating a tranquil and continuous sense of flow for the changing seasons. (Hopefully, I'll remember to refer back to this when I need it in the future.)
How exactly do you elegantly switch seasons? Initially, my only thought was the clumsy method of "creating four different Levels and then switching them by pressing buttons." But after consulting Gemini, I discovered a whole new world: Data Layer (DL). Simply put, DL is like a 3D version of Photoshop layers; you can instantly show or hide elements at a specific layer without having to reload the entire map.
I added DL logic to the flower system. Specifically: when I press the number "1", the DL for "Spring" will be activated, while the other three seasons will be unloaded.


To complete the four seasons, I resorted to the "copy and paste" method, resulting in my Event Graph becoming a completely intricate "map." Looking at the tangled lines of logic on the screen, I knew perfectly well that there must be a simpler, more professional way to reduce this complexity. But no worries, I'll leave optimization to my more professional self in the future! ;)
Since the Data Layer can only manage static objects that are pre-placed in the level, I have to find another way to summon the "Lycoris radiata" that I summon in real time through the Event Graph. I assigned a unique Actor Tag to each flower of a specific color (e.g., RedFlower). This is like giving each flower an ID card, allowing me to instantly identify all objects of a specific color in a vast sea of flowers.

I developed a custom function with 6 inputs (4 tag slots and 2 Boolean switches), which I think of as the "cleaner" of the screen. The logic is as follows:
Select All Tags: Grab the target using
Get All Actors with Tag.Loop Processing: Use
For Each Loopto inspect each flower one by one.State Switching: The key function that is ultimately executed is
Set Actor Hidden in Game.Logical Threshold: I set Booleans to control the switching.
When Hidden = True, the flower disappears, making way for the next season.
When Hidden = False, the flower blooms.
Although this makes my function internally look a bit like a relay race (running from the first tag to the second), it successfully solves the problem of dynamic objects not disappearing with the changing seasons.
During a break, I tested the basic operation of the Arduino. As shown in the picture, when a pin touches the corresponding interface, the Arduino successfully outputs the corresponding number on the computer.

Next, all I need to do is solder the TCS34725 sensor, get it to detect colors and send the results back to the Arduino, and the whole system should be basically working (right?). I'm begging it to work though ^^


:) At least I tried, right? I'm not sure if the inconsistent pin lengths will affect the stability of the sensing on the breadboard. If it fails, I'll just have to order a new one.
Day 5
Today's goal is to improve the transition animations. Currently, the transitions after pressing the number keys are too abrupt and fail to convey the "sense of time flow" I want. My idea is that when a seasonal change is triggered, the camera will first accelerate and rotate instantly, creating a blurry feeling of time travel, before gracefully slowing down to enter the target season.

To precisely control the pacing, I used Timeline Nodes. By adjusting the keyframe, I designed a "slow-fast-slow" speed curve:
Rotation Offset: Controls the rotation dynamics within this two-second interval, making the transition between acceleration and deceleration appear organic.
Switch Season Cut: I set it to precisely switch the season data at the 1st second of the animation (out of a total of 2 seconds).
Simply accelerating the rotation wasn't enough; I needed more "atmosphere." So I added PostProcessVolume to the scene. This is a powerful rendering control tool; simply put, it's like putting a "professional camera filter" on a 3D scene. I specifically enabled Lens Flares and Motion Blur to create visual tension and a sense of illusion during the transitions.
During testing, I discovered several minor flaws: for example, when we were already in "Spring (1)," repeatedly pressing the number key 1 would still trigger a transition animation. Furthermore, the way the flowers "instantly appear" and grow seemed too abrupt.
I first addressed the "repeated triggering" issue by upgrading the logic:


Capture Initial State: Obtain the Z-axis value at the moment of triggering using
Set Initial Yaw.Perfect 360-Degree Rotation: Add 360 degrees to the current Z-axis within the animation function to ensure the camera perfectly circles the tree.
State Management (Current Season Index): I added an Integer variable called
Current Season Index. Using a branching mechanism, the system first compares the "current season" with the "input number".True (Same): No transition animation is triggered; only new flowers are generated.
False (Different): A transition animation is initiated, and the Index value is updated after the animation ends.
This loop of "getting data, retrieving data, triggering animation, and updating data" makes the system more stable and intelligent.
In short, the functions I worked on today focused on how to get the current data, retrieve the data, trigger the animation, and update the data. The next goals are:
Delay the flower growth time to avoid conflicting with rotation.
How to generate flowers within the camera's field of view.
The changing seasons or changes in sky color.
Day 6

Although I wrote down my goals for today yesterday, I still wanted to continue tweaking the transition animations when I opened the file. My first attempt was to insert a Solid Color Frontground directly in the middle of the transition to give it a flickering feel. But it actually looks quite awkward; the flickering feels somewhat meaningless.
So I thought, if blurring doesn't work, and adding a frontground doesn't work either, then what else can I use? That's when I thought of Zoom in Camera View. Although I used Zoom out in the video demo above, I think the decision to use Zoom out was the right one. It makes the rotation feel faster and gives the feeling of time speeding up.

I added a track called "FOV_Track" to the camera control function to adjust the camera focal point. As more and more functions are added, I'm starting to panic. I'm afraid that even the smallest change will take me half an hour to an hour to debug or reconnect the logic.
Next, I changed how to make the flowers appear within the camera's field of view instead of in places I couldn't see.

In simple terms, the logic of the above pattern is: "When I press 5, the drone will randomly find a surface 'less than 150 cm' (usually the ground) within the designated area and plant a golden spider lily there."
Step 1: Selecting the "Drop Area"
This is like drawing a large bounding box on a map.
Activation Command: When you press "5" on the keyboard, the drone receives the deployment command.
Random Point Selection: Within this bounding box, the drone randomly points to a point.
Step 2: Firing the "Detection Laser"
After selecting the point, the drone doesn't know if there's floor, a tree, or a cliff below it, so it needs to "scout" first.
Line Trace: The drone fires an invisible laser from above the point it's pointing to.
Collision Search: The laser continues downwards until it hits the first object (which could be the floor or a tree branch).
Step 3: Two "Security Gates" (Branch)
This is the smartest part! Before planting the flower, the drone asks itself two questions:
First Gate (Did it hit anything?): If the laser hits nothing in the void, the drone won't move.
Second Gate (Is this too high?): This is the logic you just strengthened. The drone checks the height (Z-axis) of the impact point. If the height of this point is less than 150 (meaning it's very close to the ground), it considers it a acceptable planting point.
If it hits a tall branch (height > 150), the drone will think, "This is too high, I won't plant," and end the mission.
Step 4: Precisely "Planting the Golden Flower"
If both security gates pass (both True), the final step is SpawnActor (generating the flower).
Precise Positioning (Impact Point): The flower will grow precisely on the point where the laser hit, not suspended in mid-air.
Rotation: Utilize the impact normal to allow the flowers to grow along a slope, rather than rigidly vertically upwards.
The idea wasn't great, but I spent two or three hours here proving that this method doesn't actually work. Flowers will still grow in places out of the camera's view, even on trees, sometimes stacked on top of other flowers like a human pyramid. But after all that tilting, fixing all this, and debugging, I'm out for today.
Day 7
This time, I want to try adding a sense of environmental change with the changing seasons to the system. My current concept is:
Spring: A morning atmosphere.
Summer: Midday sunlight, with particle effects of fluttering butterflies.
Autumn: Evening sunset, with a background adorned with golden fallen leaves.
Winter: A night scene, accompanied by visual effects of moonlight, aurora borealis, and snow on the ground.
Round 1: Experimenting with Rotating Directional Light Sources
Initially, I followed online tutorials and tried using Directional Light in Level Blueprint.
Method: Changing the light angle using
Set Actor Rotation.Logic: Imagine it as the sun; rotating it to 90 degrees represents noon, and 45 degrees represents dawn or dusk.
Problem Encountered: When I wanted to simulate "night," the sun rotated below the horizon, and the entire map turned completely black (as shown in the video). This wasn't the effect I wanted, because real-world nights should have moonlight or ambient glow, not complete darkness.
Round 2: Switching to HDRI Backdrop and Lighting Optimization
To solve the problem of complete darkness at night, I recalled my experience using Unreal Engine and decided to switch to HDRI.
Execution: I found HDRI files that matched the atmosphere of the four seasons and imported them using HDRI Backdrop from the plugin library.
Frustration and Adjustments: The preset map contained many built-in lighting elements and effects (such as Sky Atmosphere, Volumetric Cloud, etc.). Initially, I didn't delete these presets, causing interference between the HDRI images and failing to meet my expectations.
Optimization: After consulting with friends, I systematically checked and deleted unnecessary lighting effects and adjusted the adjustable elements, finally achieving a satisfactory result.
In terms of programming logic, I didn't write overly complex code. Instead, I utilized the Data Layers mechanism:
Management method: I configured unique lighting combinations and effects for each season and recorded them separately in different Data Layers.
Switching logic: When the "Spring" Layer is active, the lighting effects for other seasons are hidden (Vice Versa). Through this method, I successfully achieved smooth seasonal lighting transitions.
Currently, I'm most satisfied with winter. The other seasons still need further adjustments:
Summer: I plan to add elements of grass and fluttering butterflies to enhance the overall sense of vitality.
Winter: It looks good so far. I plan to add more snow depth or particle effects to the falling snow, and that should be about right.
Autumn: The current visuals feel too much like a desert, all deathly yellow, not the autumnal feel I want. I will make significant adjustments to the lighting and effects for autumn later.
Spring: I want to convey the feeling of a morning, but I'm still working on the details—should it be a misty atmosphere, or the texture of dew? (The way dew is depicted is another technical challenge). Alternatively, I'm considering adding rain effects, since "spring thunder" is also a very representative image of spring.
In the demo above, I added a delay feature, a subtle but crucial change:
Effect: The flowers no longer "instantly burst" out during camera rotation; instead, they begin to appear on screen 5 seconds after the rotation is complete.
Adjustment: The current 5-second delay might be a bit too long; the trigger time will be optimized based on testing results.
Also, if you look closely at the spring scenes, the flowers bloom with a spark-like eruption effect.
Future Plans: This is just a preliminary effect. I plan to recreate it using the Niagara particle system to make these effects more visually impactful and further emphasize the dynamic nature of the blooming flowers.

In the interactive scenario of the graduation exhibition, after users painstakingly wrote their letters and dropped them into the mailbox, if the camera rotated but the flowers were generated in a "blind spot" and nothing was visible, users might mistakenly think the system was malfunctioning. To avoid this negative experience, I decided to redesign the flower generation logic.
I adjusted my mindset and started afresh, abandoning the fixed-position generation method that had proven ineffective in the previous project, and instead allowing the generation area to rotate with the camera.
If the generation area follows the camera and avoids specific angles that would obscure the view, it would ensure that every flower appears in the user's field of vision, eliminating blind spots.

I added three different boxes (collision boxes/trigger boxes) to the Camera element and fine-tuned them using the following steps:
Critical Point Testing: I placed a small cube in the scene as a reference point and continuously moved it to test the camera's maximum distance and viewpoint boundaries.
Boundary Setting: Through repeated testing, I found the critical point where the flower generation would neither exceed the frame nor appear too abrupt, and finally set the precise size and position of these three boxes.

I removed the four fixed areas in the scene (previously using Trigger Boxes) and replaced them with three boxes directly referenced from the Camera.
Detection and Selection: These three boxes were linked together using an Array in the Blueprint.
Double Random Logic: 1. First, a Box is randomly selected from the array using
Random. 2. Then, the X and Y values are randomly calculated within the range of that Box.Result: This ensures that the flower's generated location is unpredictable each time, but will always be within the camera's field of view.
In short, today's work went very smoothly; I didn't get bogged down in the same place for too long. Perhaps because last week's process was very difficult, leading me to become very Tilted and even Rage Quit, that failure wasn't without its lessons. Because of last week's setbacks, I did a deeper study of Unreal Engine's features, allowing me to apply these tools more flexibly today. With a basic understanding, the operation became much smoother.
Today also made me realize that we really can't overly rely on AI to solve all programming or logical problems. In terms of user experience, I found that AI sometimes struggles to communicate when dealing with context. Even though I clearly told it that last week's method wouldn't work and hoped it would provide entirely new logic, it kept referencing old conversations, endlessly spinning its wheels and fine-tuning the same function – this "skipping the needle" pattern was really frustrating.
After calming down and thinking it over, I realized I could find better alternatives (such as using a Data Layer or three different boxes). While AI models may provide "standard answers" or "most efficient solutions" found online, the software is constantly being updated:
Naming changes: Many older functions have been deprecated or renamed (e.g., the search path for
Set Actor Rotationin different contexts).Black box dilemma: If I don't know the underlying logic of a particular node, I can't apply it to other situations and can only passively ask the AI for new names.
This made me realize that while using AI, we must maintain independent thinking and understand the working mechanisms behind these functions so that the workflow can truly become smooth, rather than being led by the tools.
Day 8
Today I'm focusing on connecting the Arduino with Unreal Engine 5 (UE5). I've already set up the basic system architecture, and today's goal is to test how to trigger seasonal animation effects in UE5 using physical sensors.
First, I tested the system's basic architecture to ensure that the Arduino could correctly trigger the special effects animations. As shown in the video, when I manually simulated input signals (inputting any number 1, 2, 3, or 4), the system could instantly switch to the corresponding animation for that season.
Since I hadn't used this sensor before (presumably an infrared distance sensor), I wasn't initially sure how it worked. It wasn't until I plugged it into the breadboard and connected it to the Arduino that I gained a concrete understanding of its principles. The glowing part in the video is its sensing area; when an object approaches, it transmits a change in value, while when there are no obstructions, the data fluctuates within a fixed range.
The initial testing went smoothly using the Arduino IDE's Serial Monitor.
Next, I spent an entire afternoon figuring out how to establish a system-level connection between the Arduino and UE5. I downloaded a plugin called UE4duino, but because the version was quite old, I had to download an additional execution environment to compile and update it before it could be used in UE5.
During debugging, I used a series of Print String statements to monitor the system's feedback. This was crucial because I encountered a problem: although the data displayed correctly in the Arduino IDE, it couldn't be correctly detected and transmitted back to the UE5. By continuously printing out the strings, I checked one by one to find out which part of the process went wrong.

This Image shows my current final solution. The logic is as follows: When the game starts, the system first prints a start message, then attempts to open the computer's Port #6. If successful, the system sends back a success message (otherwise, it displays a failure message) and stores this connection information in a variable named MySerial for later use.

This Image shows the core of the system: data detection. The system is configured to scan data 1,000 times per second, and once a data update is detected, it reads the data. Through the Switch on String node, the system executes corresponding actions based on the received numbers. For example, when the sensor returns "1", the system initiates the first stage of generating a flower; if the data is "3", the third stage of the action is executed.
During testing, I realized the data transmitted by the sensors was not stable enough. The original idea was for the system to trigger corresponding seasonal and colored flowers based on the color of the mail, but due to the sensor's color recognition errors, this approach couldn't achieve perfect results.
After consideration, I decided to adjust my strategy:
Prioritize Stability: Rather than pursuing highly accurate but risky data, I opted for a less demanding approach.
Improve Logic: Whenever the system detects an object entering the mailbox (successful trigger), it will execute the animation feedback using a "random sampling" method. Within the limited development time, this is the "safety net" I believe best guarantees the user experience (UX) on graduation day.

Since the triggering has been changed to random, the original requirement of designing "four different mailboxes" has disappeared; now only one high-performance sensor mailbox is needed. This morning, I also started discussing the specific design details of the mailbox with my brother, including its size and internal structure, and we've already begun drawing up the design sketches.
The current development environment still uses physical wires to connect hardware, but at the graduation exhibition, messy or excessively long wires can be a significant source of instability (prone to tripping or poor contact). To achieve a cleaner and more stable exhibition environment, I ordered Bluetooth communication modules from Amazon. I hope that by transmitting data wirelessly, I can minimize the uncertainties associated with physical wiring, making the exhibition setup more professional and safer.
© 2026 All rights reserved